

 Thanks:
  Likes:
  Needs Pictures:
  Picture(s) thanks:
Results 1,291 to 1,305 of 3020
Thread: Your latest project
-
15th Aug 2014, 10:22 PM #1291
 Diamond Member


- Join Date
- Feb 2013
- Location
- Laidley, SE Qld
- Posts
- 1,039
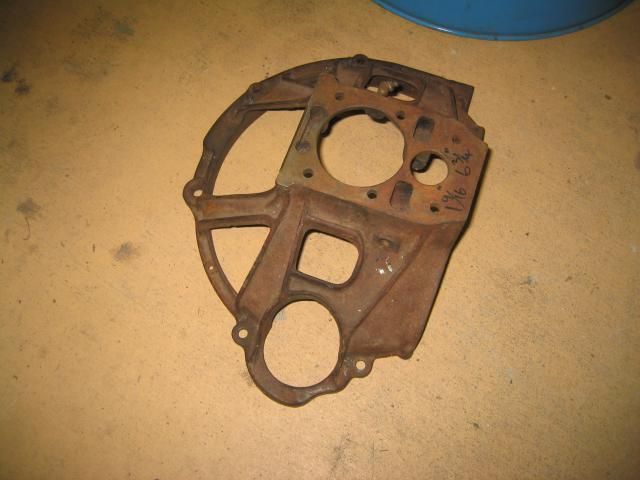
 Hudson 8 to Toyota 5 speed bell housing
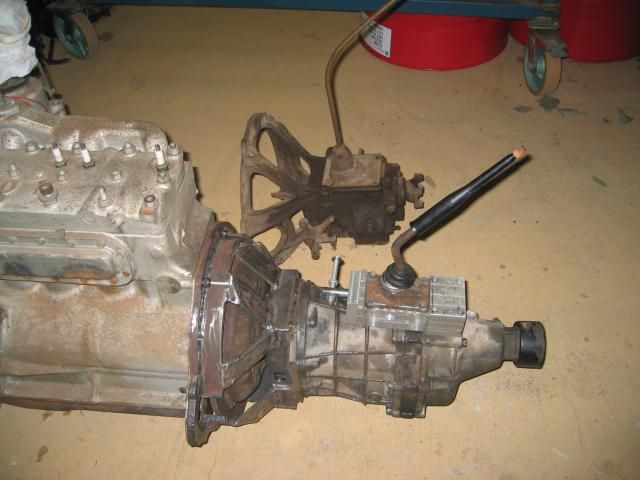
This is a stock Hudson bell housing. The plan was to fabricate something similar that would allow me to connect a Toyota 5 speed to the Hudson 8. First step was to map the engine and gearbox bolt hole and spigot locations on my mill (Hafpos HM52) using the DRO.
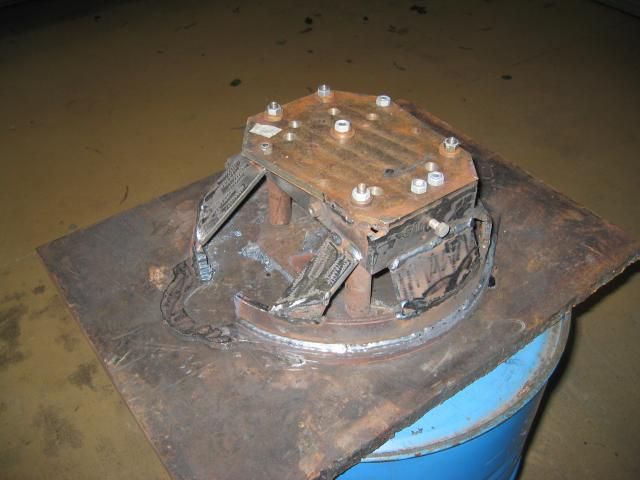
This is the project at the boiler making stage. The engine flange is tacked to a piece of 1" plate, and I've used 30mm round stand-offs to accurately position the back plate. I've given myself a 3mm machining allowance.
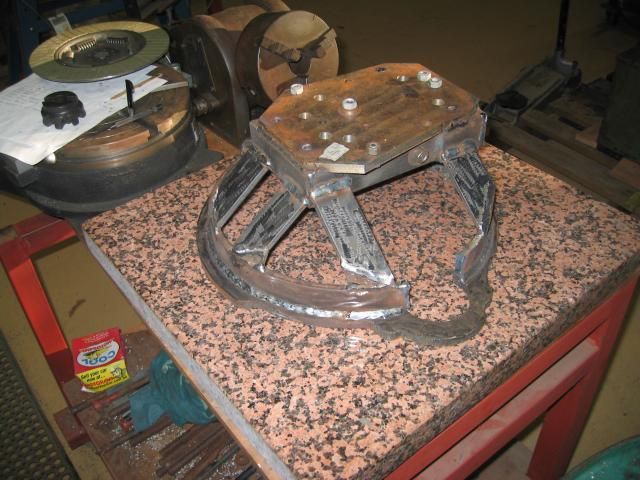
I've removed the bell housing from the welding jig and placed it on my granite plate. The bell housing has about .5mm of rock on the plate, I'm well pleased with that.
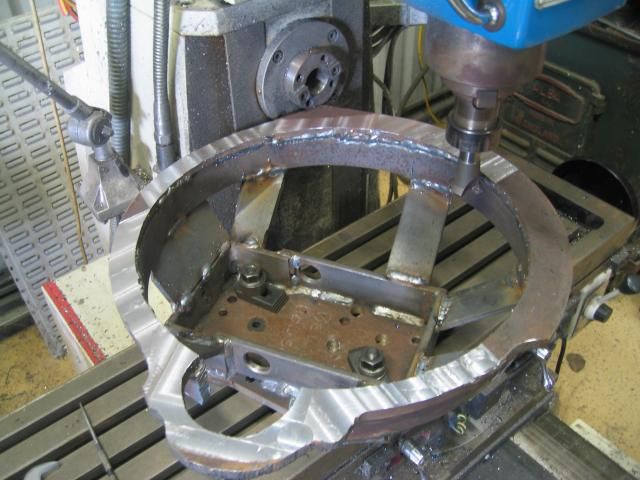
Milling the engine flange parallel to the back plate. This was the part of the project which I knew was going to be dodgy as I don't have enough Y to do the machining in one set up or enough Z to mount the bell housing on the rotary table. It worked out OK though, the steps between different passes were maybe 1 thou.
Mating the bell housing and gearbox to the engine for the first time. Since I wasn't 100% sure that everything was going to fit, it made sense to stand the engine on its nose and use a chain block to gently lower the gearbox into position. And so help me it actually fits!!! Joy oh joy oh joy!
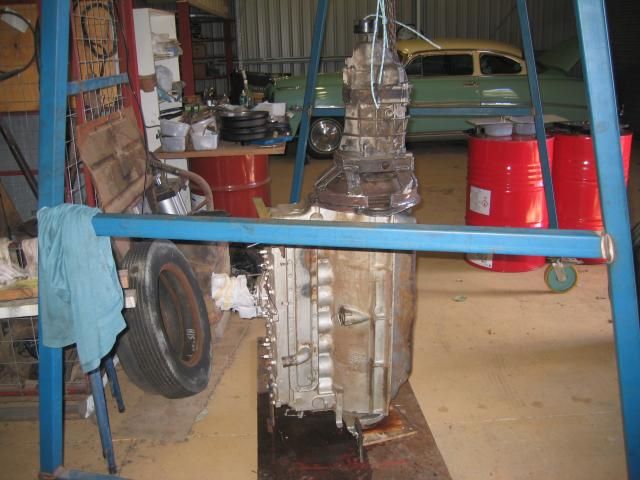
A more conventional shot of engine and gear box joined together.
-
15th Aug 2014, 11:47 PM #1292
Senior Member
- Join Date
- Apr 2010
- Location
- Rural Victoria
- Posts
- 358
Awesome work.... Originally Posted by bob ward

I had a Triumph 2000 once... handle like they are on rails. Plan was to shoehorn in a Holden 186 and Powerglide, but this meant either a boot mounted radiator or moving the firewall....
-
15th Aug 2014, 11:59 PM #1293
Diamond Member
- Join Date
- Oct 2008
- Location
- N.W.Tasmania
- Posts
- 1,407
Great work there Bob, and thank you for posting. I have never seen a skeletal bell housing before, were they more common back in the era of your Hudson?
Rob.
-
16th Aug 2014, 12:49 AM #1294
future machinist
- Join Date
- Mar 2008
- Location
- nowra
- Posts
- 1,598
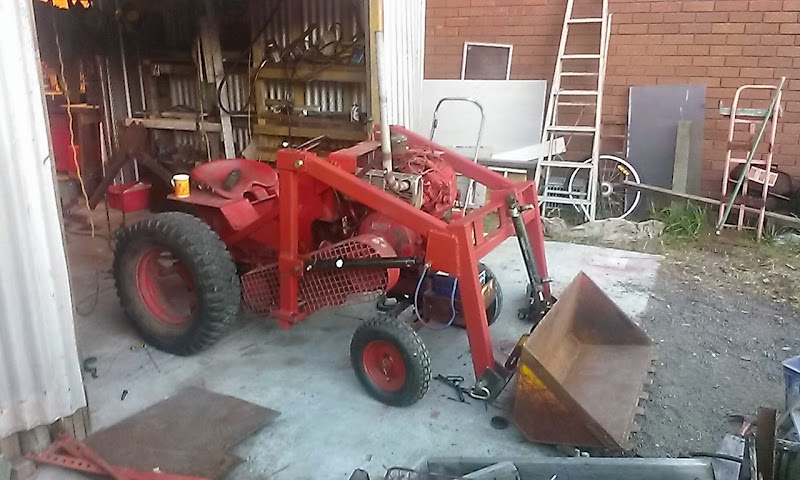
A Front loader I have been building for my howard 2000 tractor

 BETTER TO HAVE TOOLS YOU DON'T NEED THAN TO NEED TOOLS YOU DON'T HAVE
Andre
-
16th Aug 2014, 01:35 AM #1295
Most Valued Member
- Join Date
- May 2011
- Location
- Murray Bridge S Aust.
- Age
- 71
- Posts
- 5,959
Looks like a very good set up, what size bucket and did you make it or was the loader made to suit the bucket?
Kryn
-
16th Aug 2014, 01:43 AM #1296
Most Valued Member
- Join Date
- May 2011
- Location
- Murray Bridge S Aust.
- Age
- 71
- Posts
- 5,959
Nicely done Bob, is it to go in the car in the background? Certainly wouldn't be an easy job to line everything up.

Kryn
-
16th Aug 2014, 11:48 AM #1297
future machinist
- Join Date
- Mar 2008
- Location
- nowra
- Posts
- 1,598
The loader Is being made to suit the tractor, I bought the bucket from ebay its from a kanga loader. Originally Posted by KBs PensNmore
BETTER TO HAVE TOOLS YOU DON'T NEED THAN TO NEED TOOLS YOU DON'T HAVE
Andre
-
16th Aug 2014, 11:57 AM #1298

 Most Valued Member
- Join Date
- Jul 2008
- Location
- near Warragul, Victoria
- Posts
- 3,726
howard
have you seen this andre
http://www.howardregister.com/
-
16th Aug 2014, 09:12 PM #1299
Diamond Member
- Join Date
- Feb 2013
- Location
- Laidley, SE Qld
- Posts
- 1,039
@Ropetangler I don't know too much about what other makers were doing but I imagine that if they were using a dry clutch, as most makers were, they went for a conventional bell housing. A full bell housing has the benefit of acting as a dirt shield, ie it keeps dust and crap out of the pressure plate and clutch plate.
Hudson though used wet clutches, so since that needed to be sealed to retain the oil they could get away with an open bell housing.
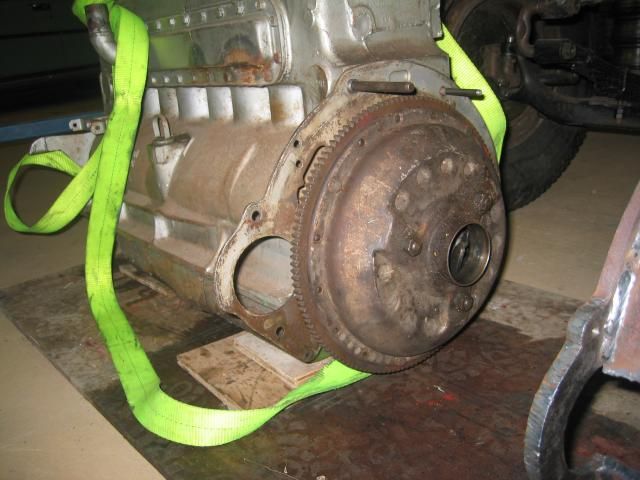
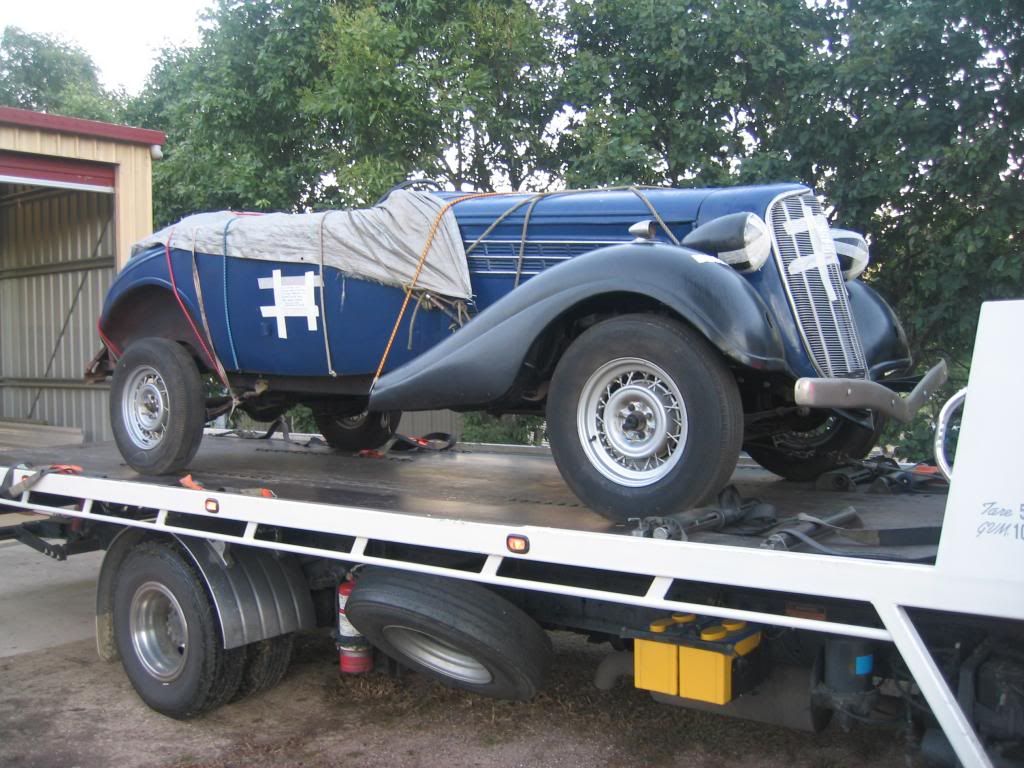
@KB This is the project car, a 35 Hudson 8 roadster.
-
1st Sep 2014, 11:11 PM #1300
Golden Member
- Join Date
- Sep 2008
- Location
- Riddells Creek, Vic.
- Posts
- 838
A friend of mine asked if I could make some special bolts for his 1924 Indian Chief restoration project, I say "special" because they are 24 tpi as are most of the threads on the bike regardless of diameter. These are 1/4" diameter and were a good project for my Hercus Compulathe although the material supplied, 4130 hex, was pretty tough.
DSC01150.jpg This photo shows 16 semi finished bolts, they just need the head faced off to length and chamfered. The single one in front is the original 90 year old bolt.
DSC01152.jpg A finished bolt next to the original, I made the new ones slightly longer for a little extra engagement into the rear brake linkage.
-
1st Sep 2014, 11:32 PM #1301
Diamond Member
- Join Date
- Oct 2008
- Location
- N.W.Tasmania
- Posts
- 1,407
Thanks Bob, I have only just seen your response as we have had some time away and also been tied up with other stuff a fair bit, and in general have not had much forum time. Is your wet clutch a multi-plate unit or just a single plate affair. Originally Posted by bob ward
Rob.
-
2nd Sep 2014, 11:01 AM #1302
Golden Member
- Join Date
- Mar 2009
- Location
- Melbourne
- Age
- 54
- Posts
- 825
That's some really nice work with the bolts Techo.
How long does the compulathe take to turn out each one?
It would be interesting to see a clip of the process.
Cheers,
Greg.
-
3rd Sep 2014, 05:52 PM #1303
Golden Member
- Join Date
- Sep 2008
- Location
- Riddells Creek, Vic.
- Posts
- 838
Thanks Greg, I did not make a video of these bolts but I do have a couple of You Tube clips in this thread showing the little machine in action cutting threads. http://www.woodworkforums.com/showth...=177636&page=3
-
12th Sep 2014, 09:50 PM #1304
Blacksmith, Cabinetmaker, Machinist, Messmaker
- Join Date
- Dec 2011
- Location
- Canberra
- Age
- 40
- Posts
- 4,515
Ask and thou shalt receive...... Originally Posted by .RC.
It's hard to tell from the pics (and they don't show just how impressive it really is) but thats a 2" wide 46k wheel probably taking .004" with a 1" stepover. Even with the coolant up fully the shower of sparks is huge. I had to put a rail on the end of the chuck to stop the parts moving, with the chuck loaded up the hold per part drops.
Ew1915 17"x50" LeBlond heavy duty Lathe, 24" Queen city shaper, 1970's G Vernier FV.3.TO Universal Mill, 1958 Blohm HFS 6 surface grinder, 1942 Rivett 715 Lathe, 14"x40" Antrac Lathe, Startrite H225 Bandsaw, 1949 Hercus Camelback Drill press, 1947 Holbrook C10 Lathe.
-
14th Sep 2014, 07:34 PM #1305
I break stuff...
- Join Date
- Aug 2010
- Location
- Toorloo Arm, VIC
- Age
- 39
- Posts
- 1,297
Found time to knock these two out among my other duties for the weekend... The little one will see duty in some form(s) of radius cutters I will have need for in the not to distant future. The other is to make use of the 100 degree corners, since I have about 15 ccmt inserts in a box with the 80 degree corners all destroyed in one way or another. Not to mention the couple of boxes of inserts I'm yet to destroy the 80 degree corners on

And how does it work? Brilliantly, as you might suspect - I've previously noticed angling the cutting edge so that it cuts from the outside in yields great returns in terms of depth of cut available, and this is no exception. The long spiral is 2.5mm off the radius, and about 0.2mm thick, and with no trouble at all (AL335 and what I think is free machining steel). In contrast, my regular turning and facing CCMT holder tends to hum in the same cut, like its on the verge of chatter.
The short tight spiral, on the other hand, is somewhat of an anomaly. After my brilliant success at 2.5mm doc, and in no way at all related to Keith Fenners 'face off' videos I was watching last night , I wound on 5mm doc. As I started to crank the carriage, a thought went through my mind that this doesn't seem like a good idea actually. Nevertheless, kept winding, the motor dropped speed a little, and swarf began to hail down everywhere. No problem at all, even varying the feed rate, and by the sound of the motor, I could have even been a bit deeper. 5mm off the radius, and again about 0.2mm thick. Large amounts of gleeful cackling resulted at this point...
The anomaly part comes in now though - I can't repeat it, just results in truckloads of chatter. Flipped the insert, no change. Moved the piece in the chuck, tried a fresh piece of the same stuff, no go. The only possibility I can come up with is that the QC tool holder itself is a bit of a loose fit, and tilts over to the side when it's locked in. When I removed the holder, it was jammed in, and I had to tap it up with a rubber mallet, so I'm wondering whether it tilted over a bit further under the cutting load, and resulted in a near zero rake insert. At some stage I'll put the insert holder in a better QC holder, and experiment some more, I think.
Either way, it would still do the 2.5mm cut all day without a hint of struggling, and I'm using up what are now effectively free inserts, so as far as I'm concerned, it's a win! Next up, a tree trunk sized boring bar .
.
And yes, at the moment I only have one insert retaining screw for all my holders. More are on the way...


 Reply With Quote


Similar Threads
-
latest little project
By wayno60 in forum WELDINGReplies: 3Last Post: 12th Jul 2008, 03:40 PM
