

 Thanks: 0
 Likes: 0
 Needs Pictures: 0
 Picture(s) thanks: 0
Results 1 to 10 of 10
Thread: Replacing a Switch.
-
29th Apr 2017, 02:14 PM #1
 Golden Member


- Join Date
- Aug 2008
- Location
- Tennant Creek, Aust
- Age
- 61
- Posts
- 601
 Replacing a Switch.
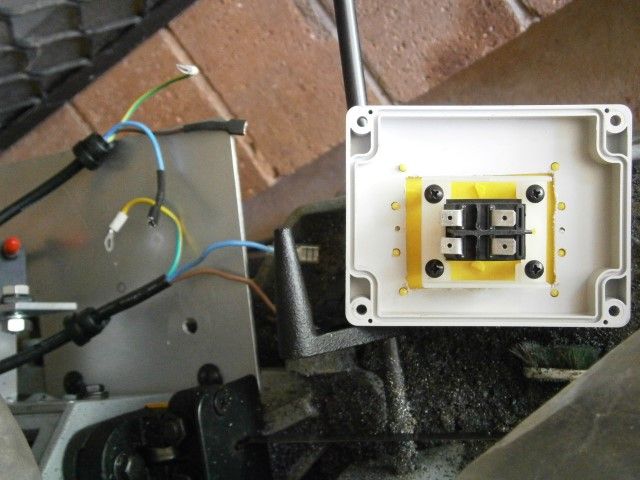
A sparkie removed the switch from my bandsaw a while ago, the new one arrived, no sparke advailable over this long week end, so where do i plug the wires in?
The switch.
BL023 | Switch #23 | For Sale Sydney Brisbane Melbourne Perth | Buy Workshop Equipment & Machinery online at machineryhouse.com.au
The red button is closest to the wires.
top, L/H marked 1, R/H 4
bottom, L/H 3 marked 6 R/H


Ratty 05/2004 -05/07/2010 COOPER 01/08/1998-31/01/2012
-
29th Apr 2017, 03:16 PM #2
Banned
- Join Date
- Feb 2015
- Location
- Oz
- Age
- 73
- Posts
- 459
Both active and neutral are switched so opposing terminals take the same colour, doesn't matter which. Earth to a convenient post. Looks the same as my BS5S switch.
-
29th Apr 2017, 03:56 PM #3
Diamond Member
- Join Date
- Sep 2006
- Location
- Australind , WA
- Age
- 58
- Posts
- 1,281
As Sac51 says. Best to check which terminals open and close when the switch is operated, to be sure.
Got a continuity tester, of some description?
Bandsaw switch.jpg
-
29th Apr 2017, 05:26 PM #4
Banned
- Join Date
- Feb 2015
- Location
- Oz
- Age
- 73
- Posts
- 459
Here you go, same switch just a different colour. If it's of any use, I found the 6mm bolt that switches the saw off automatically very difficult to adjust properly, a lot of the time after the bandsaw switched off it would start up by itself five minutes later. The bolt head also destroyed the clear membrane. To remedy I welded a large washer to the head of the bolt, the bandsaw doesn't start up by itself anymore and it should be kinder to the membrane.
-
29th Apr 2017, 09:02 PM #5
Golden Member
- Join Date
- Aug 2008
- Location
- Tennant Creek, Aust
- Age
- 61
- Posts
- 601
Thanks you for help Sacc51 and Sterob, problem solved.

My band saw is a BS5S as well, the original black box was cracked and recently a piece fell out of it, couldent find the same size to replace it, so got a water proof electrical junction box.
Ratty 05/2004 -05/07/2010 COOPER 01/08/1998-31/01/2012
-
29th Apr 2017, 09:55 PM #6
Diamond Member
- Join Date
- Sep 2006
- Location
- Australind , WA
- Age
- 58
- Posts
- 1,281
Its what we do......
-
29th Apr 2017, 11:48 PM #7
Banned
- Join Date
- Feb 2015
- Location
- Oz
- Age
- 73
- Posts
- 459
Ha, exactly what happened to mine.
-
30th Apr 2017, 06:23 PM #8
Golden Member
- Join Date
- Apr 2009
- Location
- Ballina N.S.W.
- Posts
- 644
sacci51
The problem with these band saw switches is that they are made out of chinese junk plastic and poorly installed. When I brought my BS5S I noticed that this switch was loose on its mounting and was cracked, I contacted H&F and they sent a replacement, after inspecting the old and new one I found that both of the hold down legs on the old one were cracked, they had used self tapping screws that applied too much pressure to the legs. I tapped out the legs on the new switch to suit 1/8" whitworth and fitted two short lengths of thread into the body. I also noticed that the plastic gasket supplied to fit under the switch was way undersize and if fitted would allow the switch body to not seat and move around every time the trip bolt made contact, hence the problem of not achieving a consistent switch off. I made a new gasket and solved all the problems. I have used up 15 blades now with no switch problems. When this switch fails I will buy a much better quality one like wm460 has done.
Bob
-
30th Apr 2017, 06:57 PM #9
Banned
- Join Date
- Feb 2015
- Location
- Oz
- Age
- 73
- Posts
- 459
I think the one WM460 bought is an original replacement part, at least it looks like it. I can't see too much wrong with the switch, to my mind it's the cheap and nasty hard plastic black box it's seated in. Must be a difference in switches, mine never had a plastic gasket under the switch; instead, it had a clear membrane over the top. The membrane on mine has long gone but the switch doesn't move at all. One day I'll get around to replacing the black box underneath which is cracked - one day, been like that for a couple of years.
-
30th Apr 2017, 10:49 PM #10
Golden Member
- Join Date
- Apr 2009
- Location
- Ballina N.S.W.
- Posts
- 644
The plastic gasket that I was referring to fits under the black plastic box, your's may be right inside the bottom of the box. If you ever undo the black box you will see how the self tappers have cracked the mounting legs. Replacing the black box with a terminal box as WM460 has done is what I was referring to. The actual switch seems to work OK but if it moves all the place due to the failure of the black box mounting then you will have trouble getting a consistent motor cut out.You are right about the clear plastic cover over the on/off buttons they fail pretty quickly.
Bob


 Reply With Quote
Similar Threads
-
How to : Replacing a Lathe fwd/rev switch - HZ5B-10/2 D009
By MasterSpoon in forum ELECTRICALSReplies: 5Last Post: 28th Aug 2019, 05:47 PM -
Switch Enclosure- Switch Position Identification.
By Anorak Bob in forum METALWORK GENERALReplies: 17Last Post: 19th Jul 2016, 11:00 AM -
Replacing springs?
By Legion in forum TRAILERS & OTHER FABRICATED STUFFReplies: 6Last Post: 14th Nov 2013, 08:09 AM -
Replacing gears in 260 ATM gearbox
By BrassMonkey in forum THE HERCUS AREAReplies: 6Last Post: 29th Nov 2010, 05:47 PM -
How to tell when carbide tips need replacing
By 19brendan81 in forum METALWORK GENERALReplies: 4Last Post: 16th Nov 2009, 08:50 PM
