

 Thanks:
  Likes:
  Needs Pictures: 0
 Picture(s) thanks: 0
Results 61 to 71 of 71
-
25th Apr 2015, 06:16 PM #61
 Member: Blue and white apron brigade


- Join Date
- Feb 2006
- Location
- Perth
- Posts
- 7,189
 Sounds like the sparky didn't do proper check. He should have checked the compressor actually ran, and ran the right way.
 Originally Posted by ventureoverland

]Did you run it with the old oil first?This would have been instructive as it may have told you if the old oil was contributing to the problem.First job was to change the oil and then put everything back onto the repaired tank.This is the disgusting oil that came out Im pretty sure it was old engine oil because its WAY thicker than the new proper stuff!!replaced it with nice new compressor oil, then switched it on to find my next problem:
Secondly it's better to run the compressor with the old oil in it for a while as it drains out better when it's hot that not.When you said you used the right oil I hope it is the right oil for that compressor.
There are many grades of compressor oil and the wrong oil can cause problems although I doubt it would stop a compressor like is shown in the video
Id the motor being switched off by the pressure switch?, or stalling and something else is turning it off?
Have you tried running the compressor with no back pressure i.e. open the tank valve and see if it runs?
-
26th Apr 2015, 12:30 AM #62
Intermediate Member
- Join Date
- Aug 2008
- Location
- Perth
- Posts
- 26
I take it the tank was empty. Is the compressor valve noise due to no backpressure on the system? run it for longer and see if it continues
-
26th Apr 2015, 07:24 AM #63
Senior Member
- Join Date
- Jan 2014
- Location
- Northern Beaches, NSW
- Posts
- 288
Thanks for the hint re warming up the oil Bob - Not sure why I didn't think of that as its the same with cars (and Ive done / do plenty of those).
As for the sparky not checking the compressor would run - it was still in bits when he came! His scope was simply to wire up a 3 phase outlet.
Maybe should have made it clearer earlier, the compressor isn't plumbed into the tank yet (I just have the motor and pump bolted to it) so there is no back pressure and I have to switch the motor on and off manually (via the pressure switch's switch).
The oil is definitely the correct stuff - Its the oil that Peerless specifically sell for their compressors (they have 2 types of oil - one for screw compressors and the one Ive got, for piston type).
-
26th Apr 2015, 08:55 PM #64
Most Valued Member
- Join Date
- Jul 2010
- Location
- Melbourne
- Posts
- 9,088
Silly question. But having not run a compressor not connected to the cylinder myself, are we sure that noise isnt just the noise they make?(granted I think its unlikely but.... thats just a wag)
Stuart
-
27th Apr 2015, 07:42 AM #65
Senior Member
- Join Date
- Jan 2014
- Location
- Northern Beaches, NSW
- Posts
- 288
OK, so I connected the tanks and pressure switch to the compressor and brought it upto pressure, released some air and then allowed the pressure switch to cut back in and re-fill the tank.
https://www.youtube.com/watch?v=5_RtNUEtUMU
Its definitely quieter, but I guess the question is.... Does it sound OK, or still like it needs attention?
Thanks
J
-
27th Apr 2015, 08:29 AM #66
Member: Blue and white apron brigade
- Join Date
- Feb 2006
- Location
- Perth
- Posts
- 7,189
Video is not much help as they favour some sounds and the volume depends on my computer setting Originally Posted by ventureoverland
BTW I'd get the other belt onto the pulleys.
That motor will stretch that existing belt and then you will be up for two new belts.
-
27th Apr 2015, 01:02 PM #67
Intermediate Member
- Join Date
- Aug 2008
- Location
- Perth
- Posts
- 26
Without any back
-
27th Apr 2015, 02:07 PM #68
Most Valued Member
- Join Date
- Jul 2010
- Location
- Melbourne
- Posts
- 9,088
Is the compressor bolted down? Mine can make a shocking noise as it vibrates, it has rubber wheels one end, steel on concrete the other.(though I doubt thats it either, but thought I'd throw it out there) As Bob says, hard to tell........
Who whats to work out the rpm v noise to tell if its both cylinders or just one?
There are two belts Bob.
Stuart
-
27th Apr 2015, 04:38 PM #69
Golden Member
- Join Date
- Oct 2008
- Location
- Cairns, Q
- Posts
- 666
FWIW my 1958 vintage vertical twin 8 CFM compressor which I have owned for over 25 years makes a similar noise, though at a lower frequency - I suspect without measuring my pulleys that it is running slower than yours though. It has been running like this since I bought it with no obvious ill effects. I always assumed without investigating it, since it was like that when I bought it, that it was the non-return valve between the compressor and the air receiver.
Frank.
-
28th Apr 2015, 01:43 PM #70
Senior Member
- Join Date
- Jan 2014
- Location
- Northern Beaches, NSW
- Posts
- 288
Thanks for the advice all. I spoke to Peerless yesterday and the technical bloke suggested that I try to establish if one cylinder is pulling air in harder / quicker than the other - He reckoned I should remove both air cleaner housings, at with the compressor running and pressure around the 60 - 70 psi mark hold my hands flat in front of the air intake to feel how much each cylinder wants to pull my hand toward the intake. If their is a noticeable difference then pull the head of the one that sucks the least - Pretty sensible approach I thought.
Apparently it wouldn't be unheard of for one of the valves to be loose and be rattling around.
I'll have a look at the weekend.
Bob,
As Stuart pointed out, both belts are on. I had to put two new belts on because (in its previous life) the belt guard had come apart and had dropped onto the large pulley which over time had damage both belts. Your point about stretching is noted though, one of my jobs at the weekend is to put some more tension in the belts (by sliding the motor away from the compressor) - just a few minutes of running has stretched them a small amount but I suspect thats normal with new belts and they'll settle down.
My other job at the weekend is to repair the belt guard!
Stuart,
The compressor isn't bolted down so is free to rattle on the concrete tile floor somewhat. I do have plans to introduce either 4 x rubber feet to the underside of the feet or sit it on some fairly stiff thick rubber matting.
-
1st May 2015, 11:28 PM #71
Senior Member
- Join Date
- Jan 2014
- Location
- Northern Beaches, NSW
- Posts
- 288
So another day in the shed has gone by... and now I have a working compressor

On closer inspection of the noise, one cylinder had all 4 head bolts way looser (Im guessing about 15Nm-20Nm) than they should be (42Nm); the other cylinder had a very loose allen stud (that holds the valve assembly in place). After finding these issues I decided I would pull both heads off and see if there was any damage or signs of anything not right. Pleasingly all looked and felt fine so I cleaned up the gasket surfaces put some new gaskets back in and bolted everything back up again.
Im pretty sure that the nose the compressor makes is just that, the noise it makes and that there is nothing wrong. The only thing I haven't actually inspected is the crankshaft and conrod bearings, but to be honest they don't sound like they are goosed, so I'm going to leave well alone and start using it!
Now all I need to do is divert the tank feed pipe to some external piping to extract condensate before it hits the tank and put some air distribution pipe from the tank to the garage and my work benches. I'll probably do this as time permits though, for now, the 15m of Aldi 3/8" hose I got will have to do!
Probably the job that took the longest to do was removing, cleaning and re-installing the oil level gauge. The previous owner had used silicone sealer to glue it to the compressor. I reckon he'd used a whole tube of the stuff, no way was it ever going to leak!! The problem was I couldn't get the black oily gunk out of the gauge without removing it and soaking it in brake cleaner! Unfortunately the red "H" and "L" marks are now significantly less red than they were due to the brake cleaner, but at least I can see the oil level now - Previously I couldn't see the marks or my clean oil at all because the old oil was gunk and one of the oil in-flow holes was 99% full of silicone! Anyway, picture of gauge now once cleaned and reinstalled:
 Refurbished PV25 Oil level gauge by Jon_Kelly, on Flickr
This is the compressor when I got it - Before work commenced:
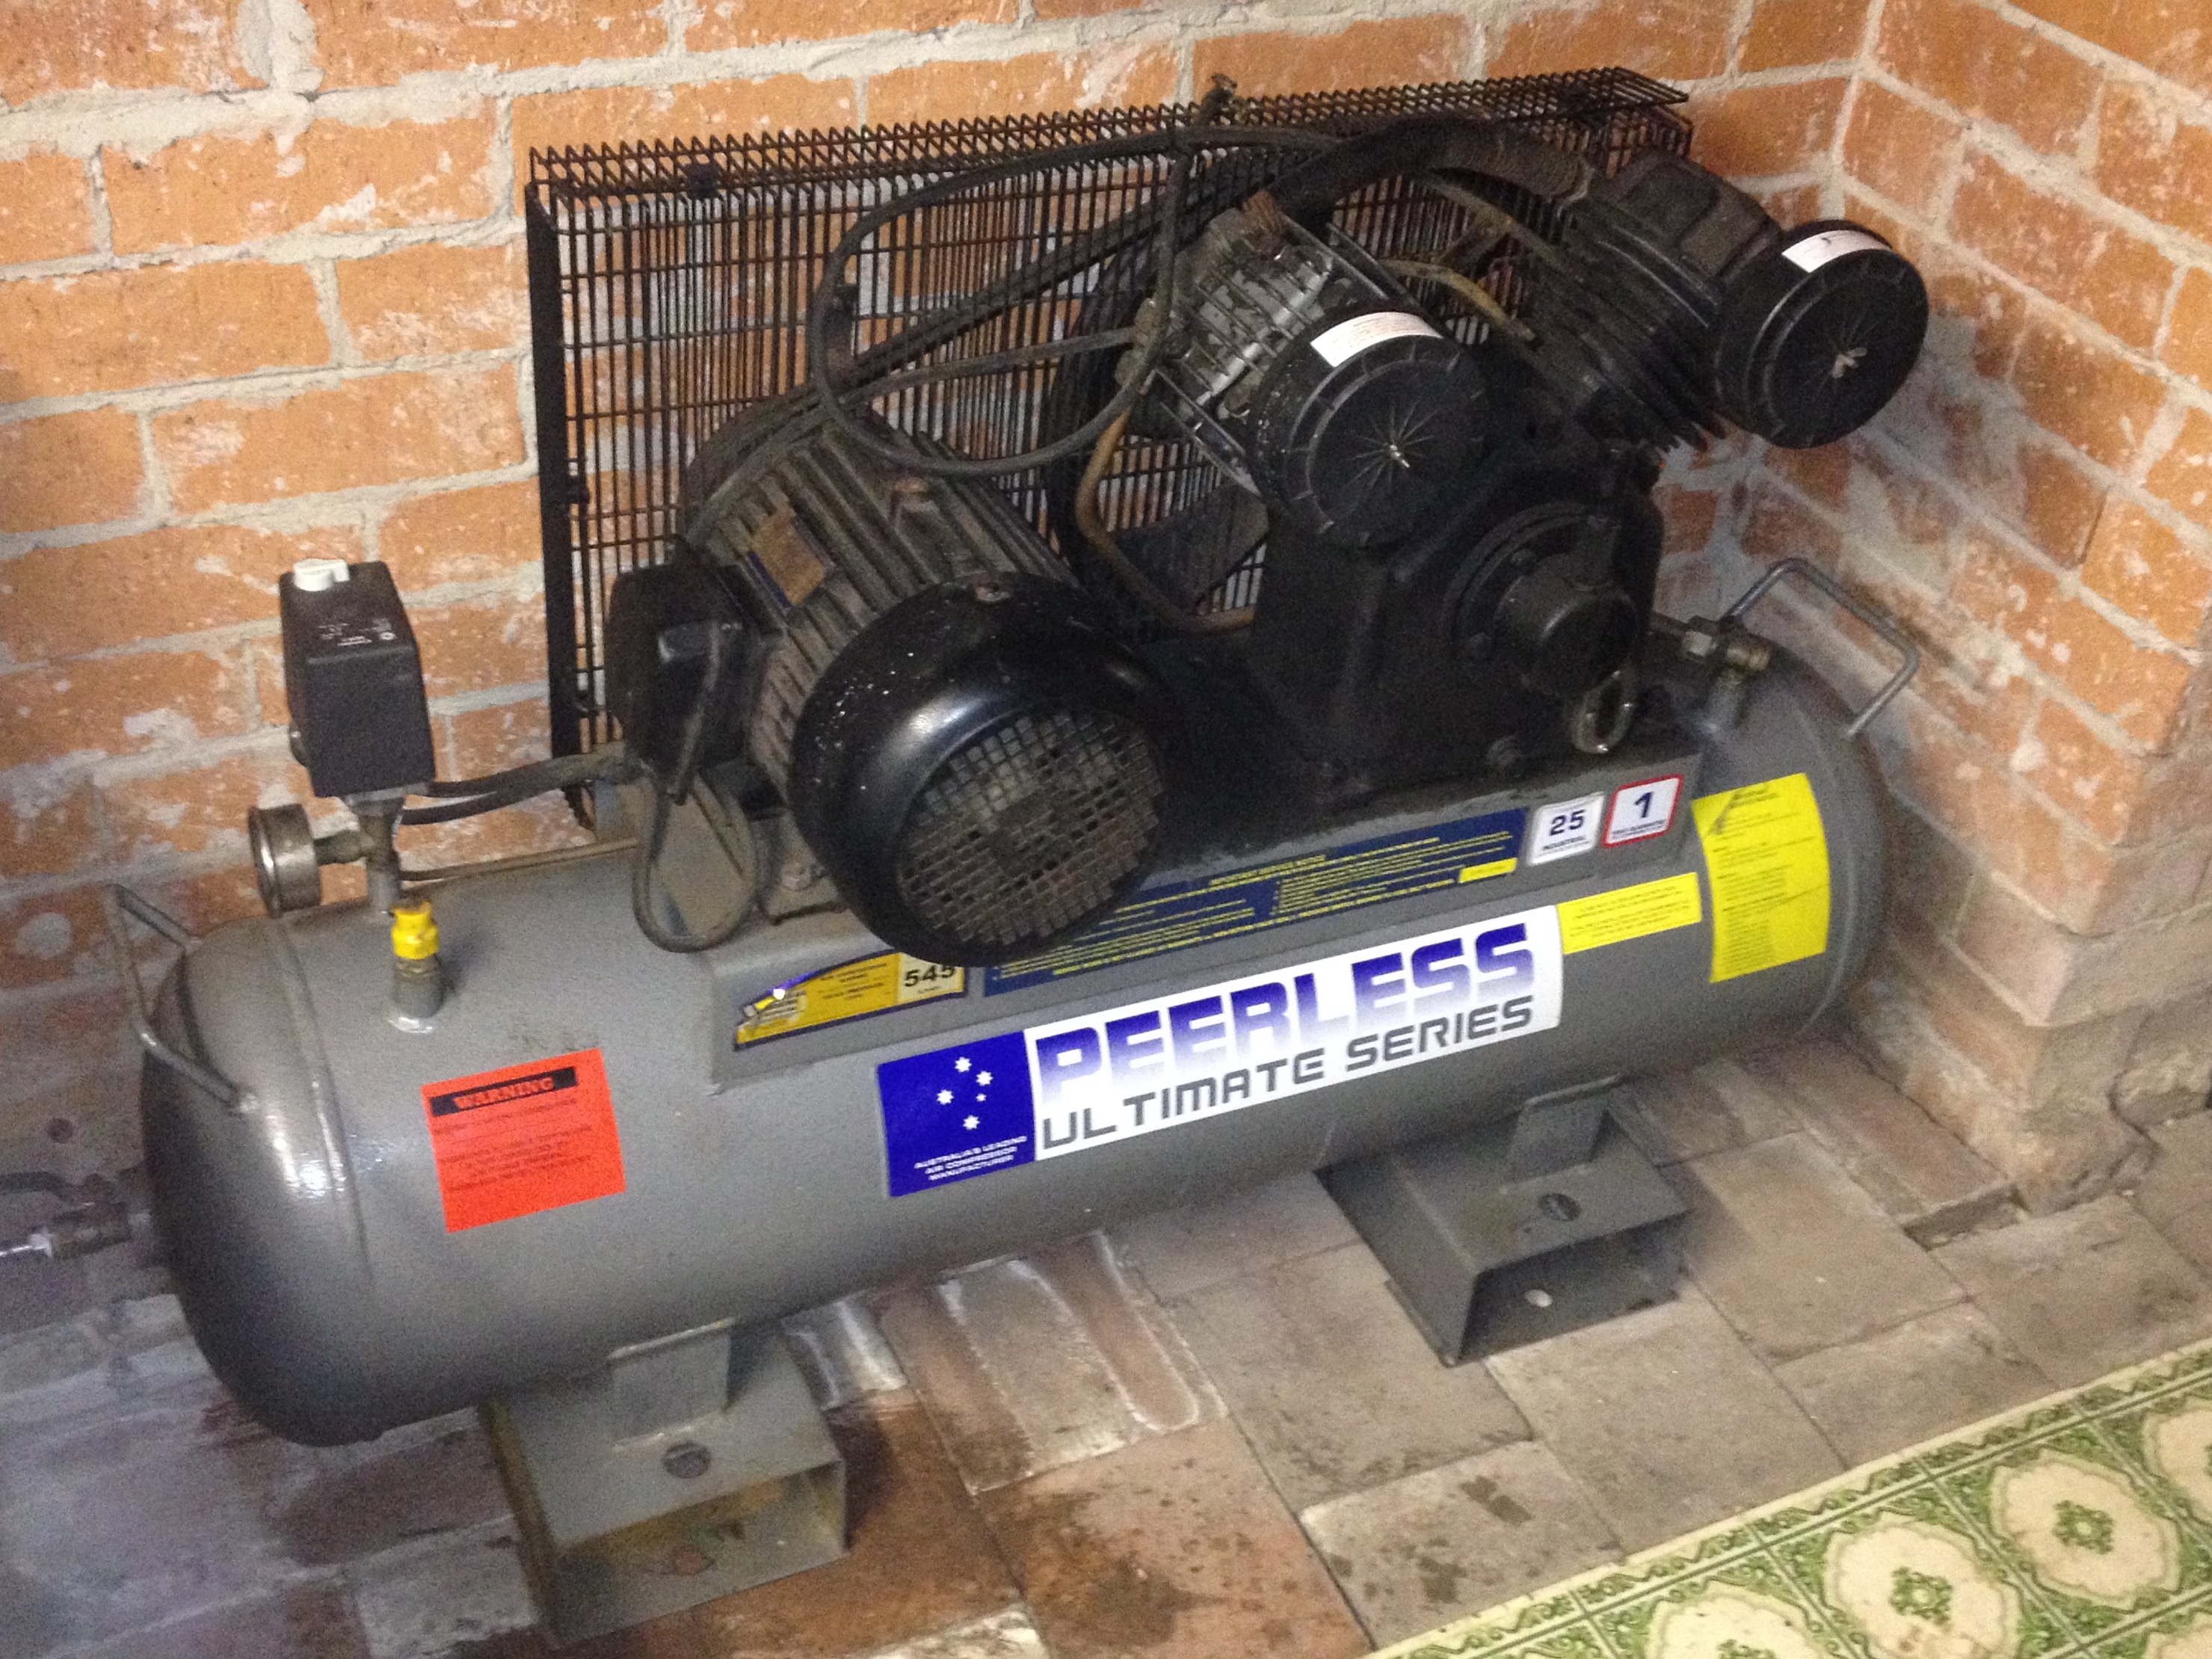 New (to me) Peerless PV25 Compressor by Jon_Kelly, on Flickr
This is the compressor today:
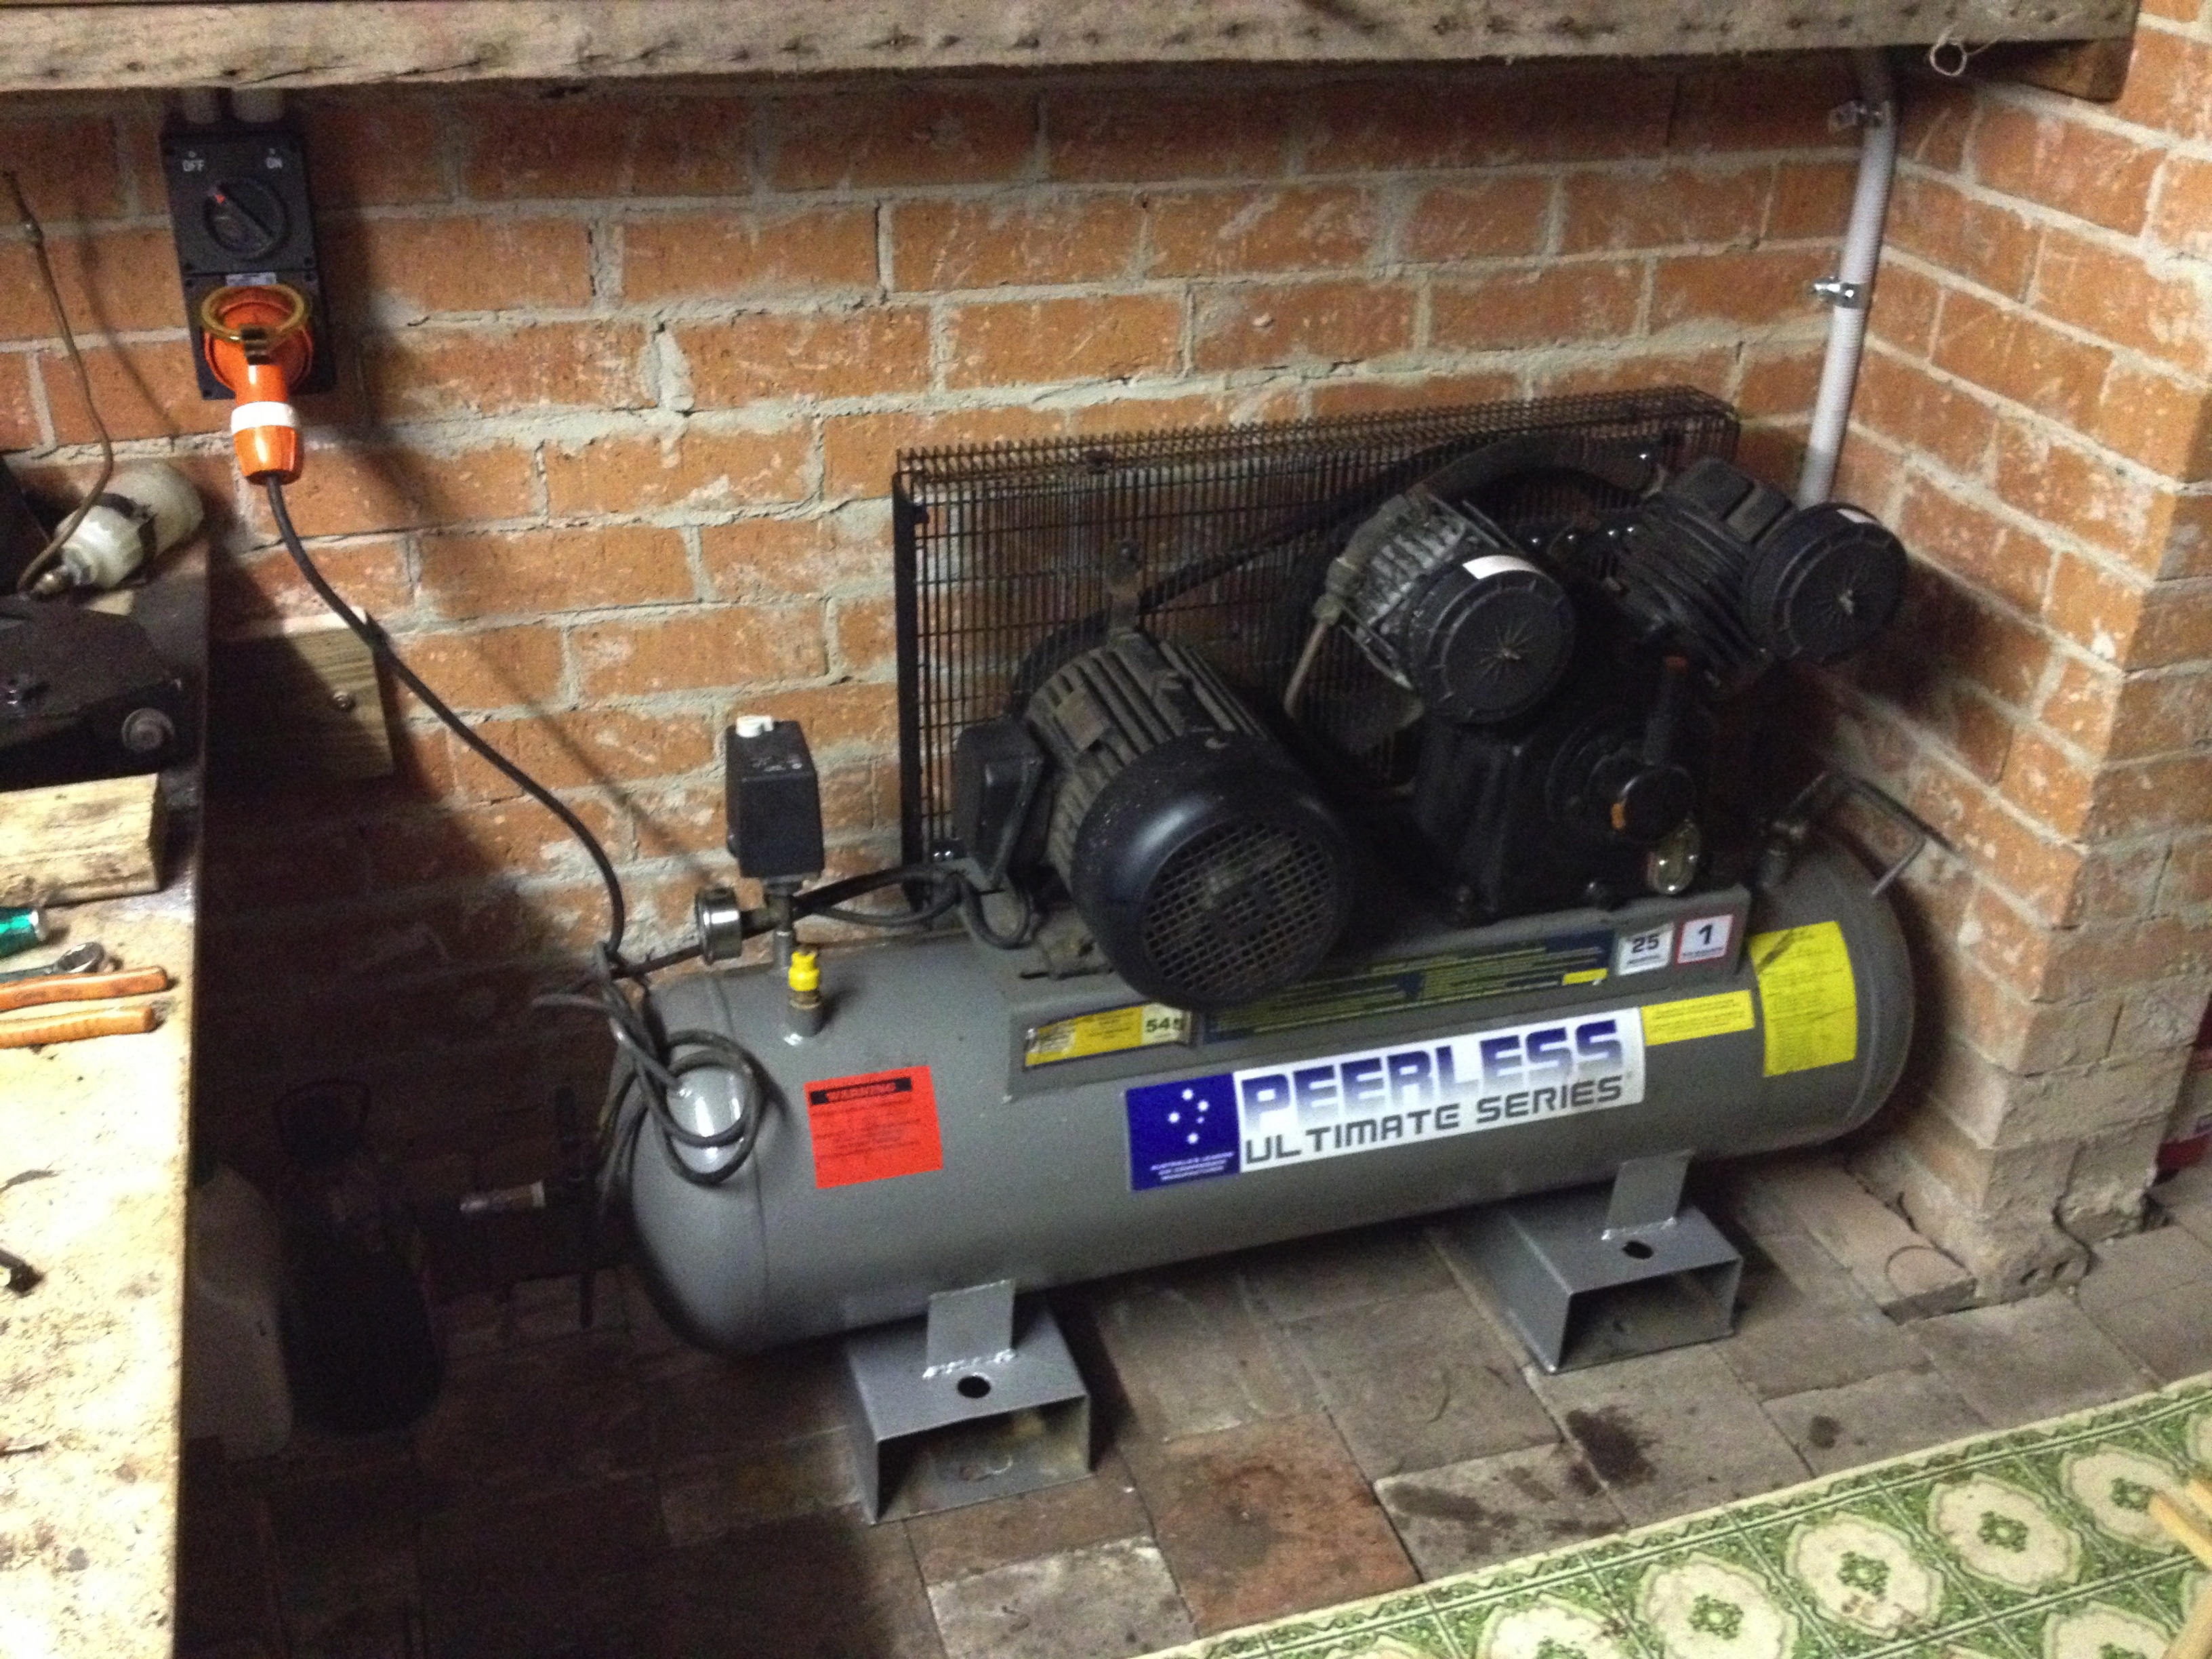 Peerless PV25 Compressor - Restored by Jon_Kelly, on Flickr
You'd be hard pressed to spot the differences - Hard to believe Ive done so much and yet you'd never know. Things's Ive done:
1. Make a new drain tap valve
2. Cleaned inside of tank
3. Removed both feet to inspect tank for leaks
4. Welded tank to fix a small leak
5. Welded feet back onto tank
6. Painted underside of tank & feet
7. Removed both cylinder heads, replaced head gaskets
8. Removed, cleaned and replaced oil level gauge
9. Flushed dirty oil, and re-filled with the correct oil
10. Repaired belt guard
11. Re-wired pressure switch and motor to use terminals and not twisted wire connections
12. Installed 3 phase plug to compressor and socket to house
In terms of cost, well I think Im still ahead if I consider my time as free. Gumtree did me proud with the plug, isolator switch and 40A breaker (all Clipsal branded - $100). Sparky charged me $100 for his time, some cable and some conduit. Compressor gaskets came with compressor.

 Reply With Quote
Similar Threads
-
3phase on single phase plus a capacitor ?
By steamingbill in forum METALWORK GENERALReplies: 22Last Post: 8th Feb 2015, 10:25 PM -
Looking to swap a 2Hp single phase motor for 1.5 or 2Hp 3-phase motor
By jhovel in forum METALWORK GENERALReplies: 7Last Post: 10th Mar 2014, 07:26 PM
