

 Thanks:
  Likes:
  Needs Pictures:
  Picture(s) thanks:
Results 31 to 45 of 188
Thread: HM52 CNC Conversion
-
25th Mar 2010, 12:30 PM #31Dave J Guest
 You can have zero backash with a slight preload on them. From factory they shim them, so you can add or subtrack the shims to get it set up to the way you want.
 Originally Posted by RayG

I just think for the small price of those bearings I linked, they would be better than the open thrust bearing that come with the machine. The standard are ok if your going to use the standard end bracket like Chich did, but if your making mounts you may as well make them for the better sealed bearings that are less prone to getting rubish in them.
Dave
-
30th Mar 2010, 07:38 PM #32
 Most Valued Member


- Join Date
- Jun 2008
- Location
- Victoria, Australia
- Age
- 74
- Posts
- 5,080
Hi Dave,
The AC bearings from VXB turned up today, pretty quick service, I have a question however, how are they preloaded? On the drawing I'm working from there is what looks like a wavy washer or a spring between the bearing pair? Is that correct?
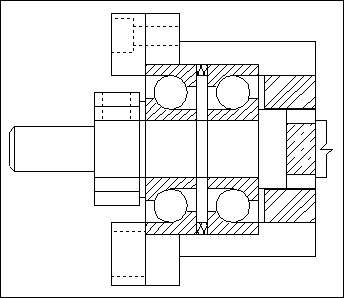
That drawing is from a post on cnczone. I'm still trying to get the details right.
Regards
Ray
-
30th Mar 2010, 07:55 PM #33
Pink 10EE owner
- Join Date
- Aug 2008
- Location
- near Rockhampton
- Posts
- 6,218
Is it a belleville washer?
-
30th Mar 2010, 08:59 PM #34Dave J Guest
Hi Ray,
I do remember seeing that drawing and I think the fellow was asking how to do it.
They usually use shims in there to space the outer of the bearings apart to preload them and leave the inners touching each other. The thread and nut on the ball screw pull the inners together.
Wave washers would be no good as they would compress, taking out the preload on the bearings when in operation.
The belleville washers though stronger, are too wide between there inner and outer diameter to fit and they would touch both parts of the bearings. Belleville washers are usually used in between ball nuts.
In the picture you can see that he has drawn a bolted cap to retain the bearings, this is the easiest way, but you can also have a threaded screw cap that has an internal thread on the top portion of the bearing bore.
Hope that makes sense.
Dave
-
3rd Apr 2010, 01:13 PM #35
Golden Member
- Join Date
- May 2003
- Location
- Perth WA
- Posts
- 526
Ray,
Have you seen this thread on CNCZone about converting a HM52 to CNC?
Here
Chich is in north Queensland so it is relative to Australia.Cheers,
Rod
-
3rd Apr 2010, 01:44 PM #36Dave J Guest
Hi Rod,
You must have missed the bit in the first post, thats were all 3 of us have got our inspiration from.
Dave
-
3rd Apr 2010, 03:29 PM #37
Golden Member
- Join Date
- May 2003
- Location
- Perth WA
- Posts
- 526
Sorry Dave,
Coming in late I just skimmed the thread and missed that link in the first post.
I converted an X3 a while back and while it will not be anywhere near as capable as a HM52 it has made a lot of parts that I would be struggling to do in manual mode.
Enjoy your journey.
In relation to the Belleville washers it raises lots of opinions. Basically if the bellevue washers compress before the friction and machining forces take effect then you have not eliminated your backlash in the dual ballnuts. Some suggest a fixed spacer as the variation in the thread pitch over such a short distance is negligable.
Just thought I would throw that in response to your last post.Cheers,
Rod
-
3rd Apr 2010, 04:17 PM #38Dave J Guest
Hi Rod,
I would like to have any size CNC mill to play with, yours sounds good. If you get bored with it you know where I am.
My son is thinking of building a CNC router to do fancy things in perspex and MDF for his and his mates car audio etc.
I totally understand and agree with what your saying about the Belleville washers, and like you I have read most if not all the opinions on CNC Zone and other forums.
It is my understanding that a solid spacer would bind in spots with P7 grade ball screws. While it might work on higher class screws with less deviation in the tread, I think the Belleville washers are the best choice for these screws as long as you don't exceed the Belleville washers load. The more Belleville washers you stack, the stronger they get, to over come them compressing under normal use.
Manufactures use this in the commercially available nuts and the IH mills use them also. They have the same size table as the HM52.
I think with all home CNC conversions, everything is experimental, so I will see how it goes, I can always add more until it's almost solid.
Thanks Dave
-
3rd Apr 2010, 08:41 PM #39
Golden Member
- Join Date
- May 2003
- Location
- Perth WA
- Posts
- 526
Dave,
That is pretty much the argument - if the bellevue washers are that stiff then why not just lock the nuts together even on a rolled C7 spec. I have locked nuts together on nook screws and it worked well. Mind you it was only on a X2 hybrid so the forces would not be as great as a HM52. Attached a couple of photos of the mills I did.
I have made seven grantry routers and have two under build at the moment so if your son needs any suggestions happy to help out. I cut 20mm ally plate on these machines so don't think they are toys. When you finish the HM52 making a grantry router will be a piece of cake.Cheers,
Rod
-
3rd Apr 2010, 09:59 PM #40Dave J Guest
Looks good, I realy like the enclosure
Thanks for the offer to help my son, I will let him know.
Dave
-
8th Apr 2010, 10:44 PM #41
Most Valued Member
- Join Date
- Jun 2008
- Location
- Victoria, Australia
- Age
- 74
- Posts
- 5,080
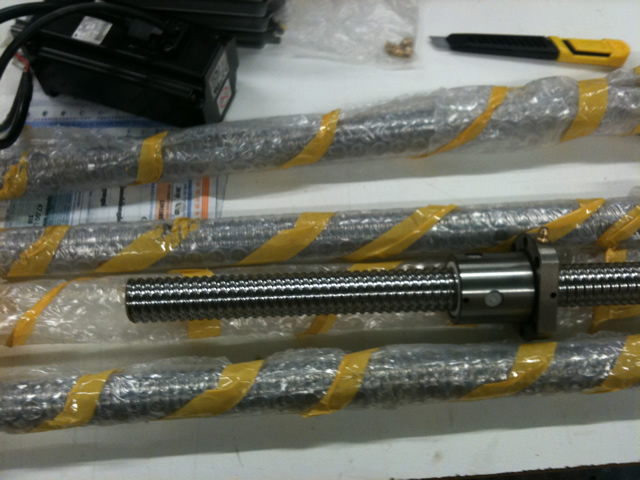
The ballscrews arrived yesterday, (they are the anti-backlash type with the oversize ball bearings) and now I need to start thinking about how I set up to machine the ends. Can't actually do any machining until after the mill arrives, and I finalize the lengths. But I might as well be prepared.
From what I've been able to glean by reading up on cnczone I need to get some soft jaws for the chuck and set up a bearing for the unsupported end.
I'm going to use carbide insert cutters, I'm pretty sure they will cut the stuff ok. ?
Any tips on what I need for machining ballscrew ends?
I am not at all keen on removing the ballnuts, from what I hear they can be a real pain in the a** to get all the balls correctly back in the track, hopefully I can avoid having to do that.
Regards
Ray
-
8th Apr 2010, 11:14 PM #42Dave J Guest
Hi Ray below is what I posted up on CNC zone which helped a few guys out putting them back to gether.
Oil the ball screws up and keep them that way because they rust real quick. Mine got a couple of little spots in 2 weeks, I cleaned them up then wrapped them up in glad wrap well oiled.
Machining the ends will have to be done through the head stock because there to long to go beyween centres. You wont need soft jaws just a 4 jaw and some scrap brass to protect the screw. I found some bits of crap in my ball nuts after I took them off so I am glad I did, it looked like plastic. I have not machined mine yet, but have read to just get under the case hardening with a decent cut and then you can thread and finish with HSS. Watch out for the little screws in the wippers there tiny and easy lost and if you do take the ball nuts off (which I recomend) do it on a plan clean cloth.
Dave
Origonal artical on CNC zone
Chinese ball nuts & screw on Ebay - Page 3 - CNCzone.com-The Largest Machinist Community on the net!
I received my ball screws in 5 days with a plastic mounting tube and 400 odd extra spare balls. I removed a couple of my 2505 ball nuts to inspect them as some were not spinning freely like the others. I was told by Chai that they are supposed to have 25 per circuit. I found that they had put an extra ball in 2 of the circuits on 1 of the nuts. After getting it back together it still didnt move freely so apart it came again and I measured the balls of the one that moved freely and the one that was tight and found it had larger balls so I think they shipped me a few ant backlash nuts in the 8 that I ordered that I never asked for. I read back in this post about him saying they didnt supply over size balls in his nuts well they do as I have at least 2 of them I havent gone through them all yet.
escott76
As for putting the balls back in I tried the tube that was supplied for transferring them but was unsuccessful so I machined up a shaft with a taper on the end that I had read on the internet somewhere still unsuccessful.
I ended and the most successful way I come up with is:
Set out each set of balls into groups. leave the plastic return pieces in the nut, put the plastic wiper on one end of the nut, holding the screw upright screw the nut on through the wiper until you see the 1st thread of the ball screw line up with the bottom of the lowest nut thread for that circuit and start dropping the balls in and using a small screwdriver or something push the balls around into the nut thread and through the plastic return, as you do this start turning the screw into the nut more and more .If you screw the ball screw in to far past the circuit just back it out a bit. Then the same for the next circuit it gets easier as the ball screw is held more firmly by each circuit.
Hope this helps you out.
Dave
-
8th Apr 2010, 11:33 PM #43
Golden Member
- Join Date
- May 2003
- Location
- Perth WA
- Posts
- 526
I've done a number of ballscrews and it is a bit scary first time but you get used to it. Expect to break a couple of tips as it is an interrupted cut on case hardened shaft. I use cheap Chinese carbide insert so you might have better results with name brand inserts. If you have a large lathe you can almost undercut the case hardening on one bite but it needs to be a large solid lathe with plenty of grunt. I have a AL330 so it needs a couple or four passes to get through the thread. Once you have done this the shaft is normal hardness and machines well - in other words now you can uncurl your toes and get on with the job.
I do it in a four jaw with copper wrapped around the thread. Coke can material at a pinch will do too. A 5C collet would be ideal to hold the ballscrew.
I load the ballscrew from the outboard side of the headstock and have made a support to hold that end in the centre of the spindle. It is a bit agricultural but is basically a plug with a 16mm hole bored through the centre. The ballscrew goes through the hole and the plug is pushed into the end of the spindled and taped in place. The nut sits outside the plug and is taped to the ballscrew. Don't take the nut off the screw unless you have to and if you do then get a tube the diameter of the inner thread and unscrew the nut onto the tube. Do this over a towel as the bearing have a habit of scattering to all parts of the workshop. I lost a couple to the slot of my table saw and it's not fun re-packing the bearings.
I hope I didn't make this sound too terrible.Cheers,
Rod
-
8th Apr 2010, 11:49 PM #44Dave J Guest
Hi Rod,
Every body has their own way of doing it, but I found the tube to be use less when I was doing it. They are really not hard to do and as I said in the previous post mine came with crap and extra balls in a few. I think it is worth the experience to take at least one off and give it a try. After that I don't think you will have any worry taking them all apart one at a time. All I used was a precision screwdriver out of one of those cheap sets for $2.
Like you said you have to be carefully not to loose any, I did mine on the ground so they had no where to go, and on a clean plan sheet, not a good one or you wont live to put them back together.
Dave
-
9th Apr 2010, 12:05 AM #45
Golden Member
- Join Date
- May 2003
- Location
- Perth WA
- Posts
- 526
I was typing when you posted so would not have responded if I knew you had. Sometimes it confuses when too many opinions are put forward.
I have repacked a few ballnuts of various flavours and usually after somebody has spilled the bearings and calls for help. That is fun as you don't know how many to re-pack and they always claim to not have lost any.
The ones with the return tube are much easier as you can load them with the nut fully on the screw. I have got a collection of ball bearings both under and oversize from the ebay seller which are handy to have in the drawer for emergencies. The Rotons and Nooks have 1/8 so you don't need a huge collection.
If you repack outside the return thread then the nut locks up on the ballscrew - it took me a while to work that one out.Cheers,
Rod

 Reply With Quote
Similar Threads
-
Hafco Hm52 on the fritz again
By Retromilling in forum METALWORK GENERALReplies: 25Last Post: 12th Aug 2009, 11:14 AM -
CNC conversion
By sonic_racing in forum METALWORK GENERALReplies: 7Last Post: 18th Jan 2009, 03:11 PM
