

 Thanks: 0
 Likes: 0
 Needs Pictures: 0
 Picture(s) thanks: 0
Results 1 to 15 of 15
Thread: Help with tig weldging angles.
-
30th Mar 2010, 09:22 PM #1
 Intermediate Member


- Join Date
- Feb 2010
- Location
- melbourne
- Posts
- 26
 Help with tig weldging angles.
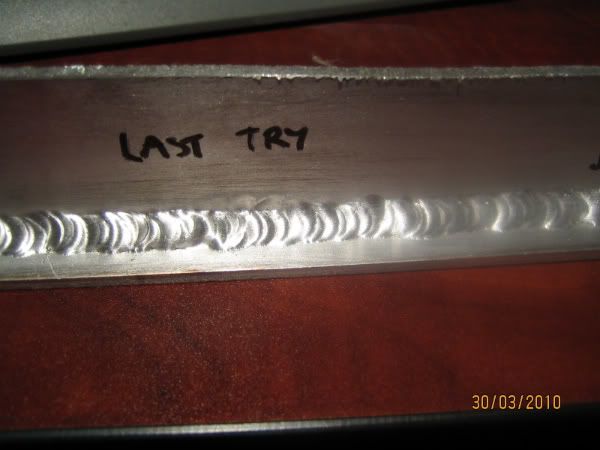
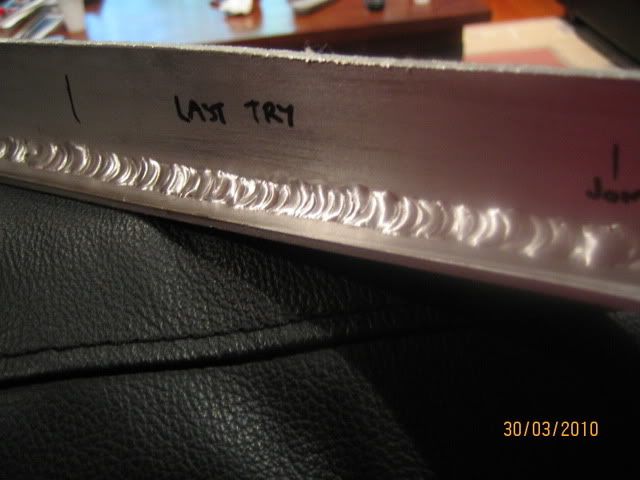
How's it going guy's.
I've just bought a 200amp AC/DC tig and it's is the first time I've welded alloy with a tig.
I have been laying weld after weld for 3 days now and I've got the flat and joint welds down pat but the angle welding is not as easy to do.
I'm getting much better compared to when I first started but I would like to get the bead's smaller.
This is a couple pics of my angle welds,please feel free to tell me what I'm doing wrong and any tips to improve.
The alloy is 3mm flat and I'm using a Zirconiated electrode.
Thank you.
-
30th Mar 2010, 10:35 PM #2
Golden Member
- Join Date
- Feb 2010
- Location
- Ballina, NSW
- Posts
- 900
search for "walking the cup' welding videos on the net - looks like a useful technique to master if you want machine like welds (I'm sure I can hear the purists protesting already!)
-
31st Mar 2010, 10:52 AM #3
Member
- Join Date
- Dec 2008
- Location
- Sydney
- Age
- 51
- Posts
- 84
Looks good already gozz! Do you have to go that much narrower?
It can be hard to get right in the corner for a smaller weld. A smaller cup would help. A touch more stick out won't hurt because the gas will stay around due to being in the corner.
Stuff that reduces the amount of heat also works:
Pulse mode (if your welder has it)
A quicker travel speed.
copper backing blocks clamped on.
Turning the AC balance to more cleaning.
etc.
One thing I haven't tried but I'm told helps to narrow the bead is to increase the AC freq. a lot. like to 100hz or more.
I wouldn't recommend walking the cup on aluminium. Your angle has to be as perpendicular as you can. Mild or stainless steel you can try it.
-
31st Mar 2010, 10:53 PM #4
Intermediate Member
- Join Date
- Feb 2010
- Location
- melbourne
- Posts
- 26
Thanks for the reply Edster. Originally Posted by Edster

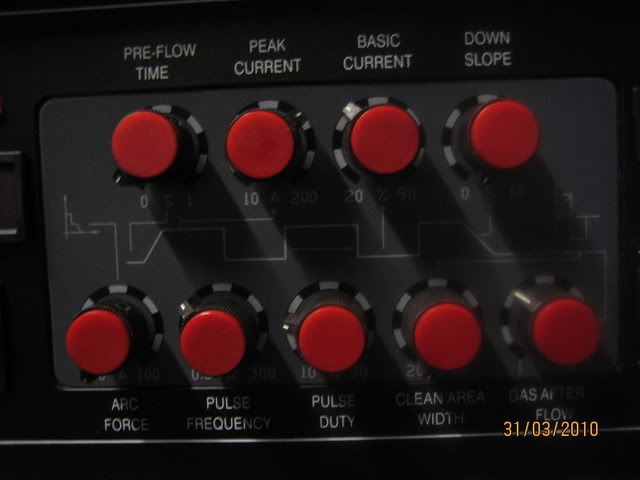
I have taken a couple photos of my front panel and was wandering what all the knobs do.
I only use the peak current knob and the after flow knob and that's it.
All the knobs you see are as I have them set,can you please tell what else I need to set to make the machine weld better.
Oh and a short run down on what the knobs mean.
Thanks heaps.
-
31st Mar 2010, 11:34 PM #5
Golden Member
- Join Date
- Feb 2010
- Location
- Ballina, NSW
- Posts
- 900
Is that because aluminium conducts the heat away faster? Originally Posted by Edster
-
1st Apr 2010, 11:01 AM #6
Member
- Join Date
- Dec 2008
- Location
- Sydney
- Age
- 51
- Posts
- 84
The panels can be quite cryptic! The manual sometimes doesn't help either.
I can make a guess on most of the knobs.
Arc force is for your stick. I'm a little unsure what it does exactly. I tend to leave it alone.
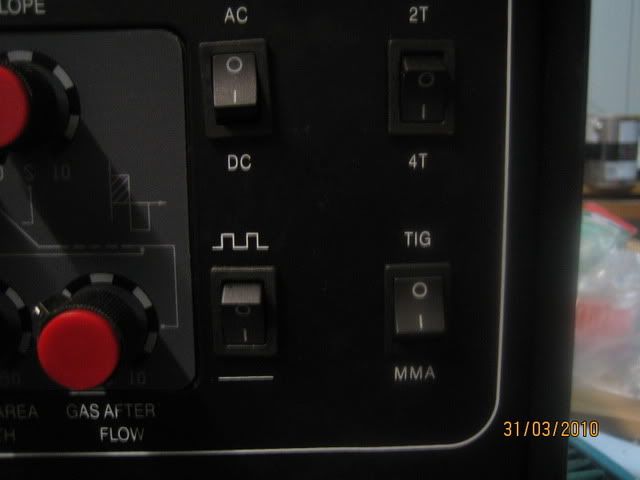
Looks like you do have pulse mode. No AC frequency control.
The "Clean Area Width" I assume is the AC balance. Turning it up I think means the AC balance goes up: more cleaning actually makes the current spend more time electrode positive than negative. This cleans more AND tends to put less heat into the material. That's what will hopefully get you a smaller bead.
The other trick is pulse mode. I think it's turned on by the switch below the AC/DC switch. Flick it up. Takes a little bit of extra coordination to do but basically you crank pulse frequency right down to 0.5 Hz. Then you adjust your peak current and base current knobs. It spends one second at the peak current and one second at the base current. You set your peak current up to whatever you used to have and a lower base current.
Say 90 amps peak. Then you put your base current at something less like 70 amps (~75%). The average current will be 80 amps but you get one second of hotter peak current. That's when you add filler. It tends to put less heat into the part.
It's kinda a substitute for just turning down the amps. With Aluminium you can't turn down too much or it doesn't weld at all. By just having a pulse of high current, you maintain the nice shiny weld bead but the average amount of current isn't as high. It will be just a smaller bead.
Playing with the Pulse Duty up or down from 50% will give you more time at the peak current and less at the base current. or vice versa.
An easier trick that I never really do is to crank the Pulse Freq right up to 100 Hz or more. It's like a fake AC Frequency of sorts. The average current will also be less but you don't time your filler rod dips. I find it has inconsistent results but you could try it.Last edited by Edster; 1st Apr 2010 at 11:17 AM. Reason: change to peak/base current setting
-
1st Apr 2010, 11:10 AM #7
Member
- Join Date
- Dec 2008
- Location
- Sydney
- Age
- 51
- Posts
- 84
It's more because you need that cleaning action of the AC current to be all the way around the bead. One you start tilting it as you would by walking the cup, the side of the leading edge of the bead would not be cleaned as much as the trailing edge. Your bead might have a lot of trouble. Originally Posted by WelderMick
If you can walk it on either side of that fillet and still keep zero lead angle you might make it work I reckon. Sounds pretty hard coordination wise though.
-
1st Apr 2010, 05:36 PM #8
Golden Member
- Join Date
- Feb 2010
- Location
- Ballina, NSW
- Posts
- 900
Edster - you're right. Even with AC cleaning up high it was inconsistent and generally a horrible experience. Still practicing it with steel, but there's an obvious difference with the metals. Thanks - Mick Originally Posted by Edster
-
1st Apr 2010, 06:18 PM #9
Intermediate Member
- Join Date
- Feb 2010
- Location
- melbourne
- Posts
- 26
Your a legend Edster,thanks for going out of your way for me.
A little later when the kid's go to bed I'll sneak of to the garage and start experimenting again.
I've noticed even going down 10 to 15amps makes a huge difference on my machine so I'll set the high at 100 and low at about 85amps.
I'll see what this does.
I also have to get used feeding the filler wire through my fingers to keep up over longer welds.
Thanks again.
-
3rd Apr 2010, 03:50 PM #10
Member
- Join Date
- Dec 2008
- Location
- Sydney
- Age
- 51
- Posts
- 84
Yep. A little change in angle tends to make a drastic difference. Originally Posted by WelderMick
You're welcome, Gozz. Let us know how it goes. Originally Posted by gozz
Feeding wire through your fingers isn't that important IMHO. The nature of tig has you stopping and starting all the time anyway. It's usually lighter stuff so you can't put that much heat into it at once. You're also limited by the length of the filler rod. As long as you can make your starts and stops seamless, you can just stop whenever and adjust your hold of the filler.
-
3rd Apr 2010, 07:22 PM #11
Intermediate Member
- Join Date
- Feb 2010
- Location
- melbourne
- Posts
- 26
I worked out if I lift the foot peddle up it reduces the heat enough for me to re adjust the filler rod and keep going. Originally Posted by Edster
I can feed the filler rod through my fingers but I'm very clumsy and looks crap.
-
3rd Apr 2010, 08:17 PM #12
 Member
- Join Date
- Apr 2010
- Location
- Melbourne
- Age
- 60
- Posts
- 95
-
6th Apr 2010, 10:04 PM #13
Intermediate Member
- Join Date
- Feb 2010
- Location
- melbourne
- Posts
- 26
I had a go at Stainless and found it much easier then alloy,the only problem was I had to use s/s mig wire for a filler as that was all I had.
Wasn't to bad just very hard to keep it straight and not wobbly being so thin.
What do you guy's find easier to tig,alloy or stainless.
-
7th Apr 2010, 12:12 PM #14
Member
- Join Date
- Dec 2008
- Location
- Sydney
- Age
- 51
- Posts
- 84
Stainless is a little more forgiving IMHO.
-
7th Apr 2010, 04:44 PM #15
Member
- Join Date
- Apr 2010
- Location
- Melbourne
- Age
- 60
- Posts
- 95

 Reply With Quote
Similar Threads
-
HSS Tool Angles, - Angles? What angles??
By Kody in forum METALWORK GENERALReplies: 1Last Post: 6th Dec 2008, 08:07 AM
